

Avoid Prefab Hell with ScriptableObject Services in Unity

Indie Game Studio Owner | Game Designer | Game Developer | Game Artist | Cloud Architect | Technology Leader | Product Manager | Entrepreneur
The Gamble
You've been tuning a game object in a scene... one with many components, some child game objects, and those have components... it's time to apply prefab overrides. Your palms sweat. You click the button, like pulling the handle of a slot machine. What unintentional changes have you rippled throughout the game, prefabs, variants and instances???
Sound familiar? If so, then I have a technique for you to try out. You should be familiar with ScriptableObject, a sibling of MonoBehaviour, used to create custom assets for a project, to centralize and organize design time settings, and often to handle runtime state and events.
A Different Approach
In this article, I'll cover using ScriptableObjects to create "service" assets, which will provide reusable game logic alongside settings that reduce dependence on the prefab workflow and introduce several other benefits such as:
- Pluggable services that can be added to game objects at design time or runtime.
- Stateless, testable, independently versioned
- Source control friendly
- Follows Single Responsibility Principle (SRP)
- Can fit into state machine, behavior tree and other common patterns
Here are the rules I use for Service Assets.
- Inherit from
ScriptableObject - No "settings" related to this logic in the
MonoBehaviour, instead they should live with the asset - No "state" or external references, everything must be passed in and then returned, like a pure function
MonoBehaviouracts as the "controller" or orchestrator of Service Assets, supplies state and references
Tackling Physics
With that, let's get hands on with an example to encapsulate some different physics scenarios with RigidBody. Physics is something I find myself often flipping settings around to get the "perfect" effects in game, which makes this a great candidate for packaging as an asset.
Project Setup
Create a new 3D project, I'm using Unity 2021.3 LTS.

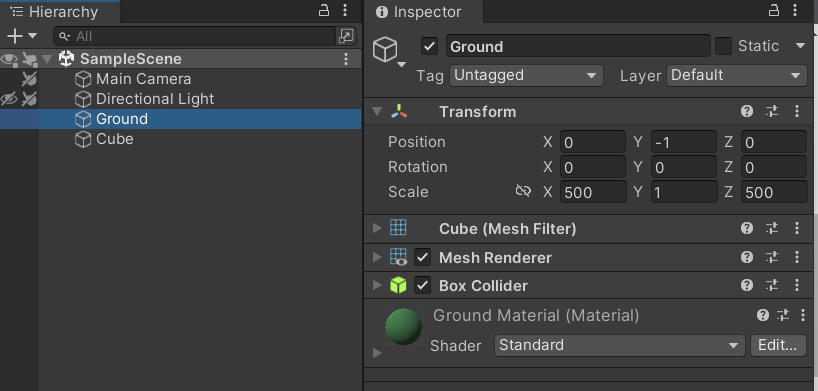
Let's start with a simple scene, add a cube that represents the ground with a box collider and green material.
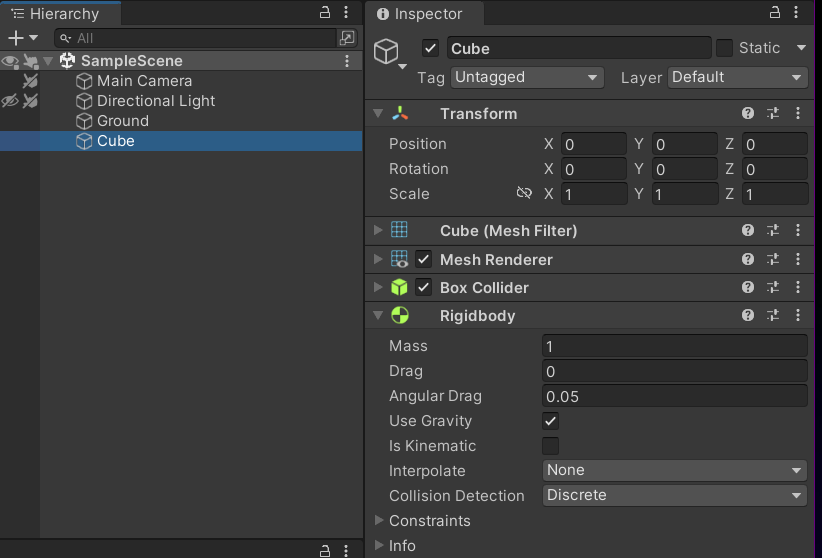
Add another cube that will be what we move around in this example, with a blue material and a RigidBody.
CubeController
Let's use a simple MonoBehaviour script to be able to move the Cube around with input. Create a CubeController script and attach it to the Cube in the scene.
using UnityEngine;

[RequireComponent(typeof(Rigidbody))]
public class CubeController : MonoBehaviour
{

    private Rigidbody body;
    private Vector3 direction;

    private void Awake()
    {
        body = GetComponent<Rigidbody>();
        direction = Vector3.zero;
    }

    private void Update()
    {
        direction.x = Input.GetAxis("Horizontal");
        direction.z = Input.GetAxis("Vertical");
        direction.Normalize(); //handle diagonal scale
    }

    private void FixedUpdate()
    {
        if (direction == Vector3.zero) return;

        // Add code to move the RigidBody
    }
}
Simple, we use Update to gather input per frame and we apply physics in FixedUpdate which will come from the new service asset. Input is captured in a Vector3 called "direction" which will be "state" that we pass to our service asset.
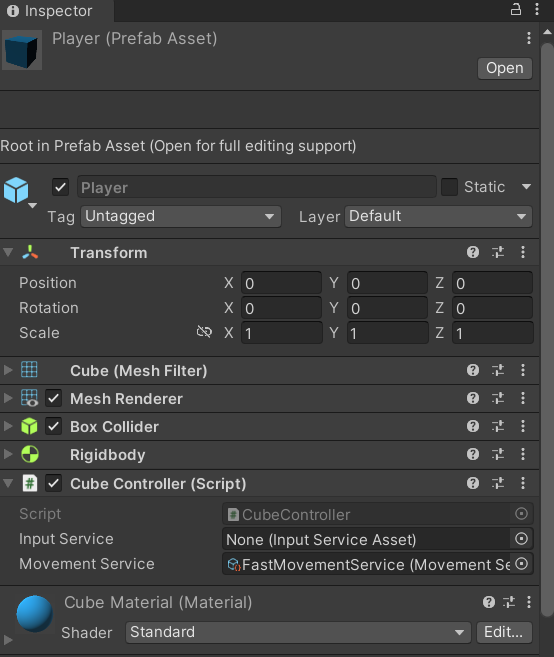
Prefab Approach
A typical approach would be to write the physics code directly in this MonoBehaviour and perhaps expose movement related settings, like "Speed" as a serialized field in the Inspector. We could then prefab it, make variants for different speed cubes, etc. But now we're back into the prefab workflow that I'd like to avoid and which will get more complex with additional components.
Service Asset
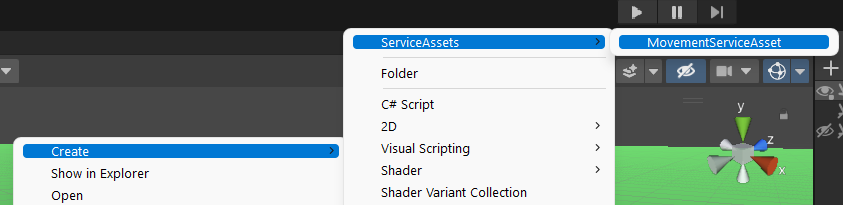
Create a new script called MovementServiceAsset, change it to inherit from ScriptableObject and then add a method that should be called from the CubeController to move using the RigidBody. Sticking to our rules, CubeController will pass in the RigidBody as a reference and direction as state.
using UnityEngine;

[CreateAssetMenu(fileName = "MovementServiceAsset", menuName = "ServiceAssets/MovementServiceAsset", order = 0)]
public class MovementServiceAsset : ScriptableObject
{
    public void Move(Rigidbody body, Vector3 direction)
    {
        Debug.Log($"Moving {body.name} in direction: {direction}");
    }
}
Assemble Parts
Now let's put this together. Add a field to the CubeController for a MovementServiceAsset that we can supply in the inspector. Then call the service asset Move method in FixedUpdate, passing the reference and state as paramaters.
using UnityEngine;

[RequireComponent(typeof(Rigidbody))]
public class CubeController : MonoBehaviour
{

    [SerializeField] private MovementServiceAsset movementService;

    private Rigidbody body;
    private Vector3 direction;

    private void Awake()
    {
        body = GetComponent<Rigidbody>();
        direction = Vector3.zero;
    }

    private void Update()
    {
        direction.x = Input.GetAxis("Horizontal");
        direction.z = Input.GetAxis("Vertical");
        direction.Normalize(); //handle diagonal scale
    }

    private void FixedUpdate()
    {
        if (direction == Vector3.zero) return;

        movementService.Move(body, direction);

    }
}
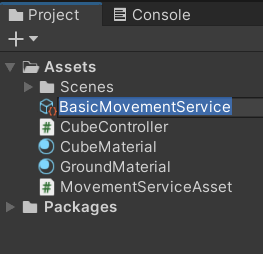
Create a new instance of our service.
Name it "BasicMovementService".
Then add the new service asset to the CubeController in the Scene.

Fire up play mode and use the WASD keys, which should trigger log messages in the Console window.

Add Settings
Now let's add some settings to the service asset, so we can change behavior of the movement logic from the editor. These settings will be saved independently in each asset instance created, such as BasicMovementService.
using UnityEngine;

[CreateAssetMenu(fileName = "MovementServiceAsset", menuName = "ServiceAssets/MovementServiceAsset")]
public class MovementServiceAsset : ScriptableObject
{
    [Header("Movement Settings")]
    [Space(10)]

    [SerializeField] private float speed;

    [Header("RigidBody Settings")]
    [Space(10)]

    [SerializeField] private ForceMode forceMode;

    public void Move(Rigidbody body, Vector3 direction)
    {
        Debug.Log($"Moving {body.name} in direction: {direction}");

        body.AddForce(direction * speed, forceMode);
    }
}
Select the BasicMovementService asset in the Project window and configure speed. We'll leave ForceMode at the default for now.
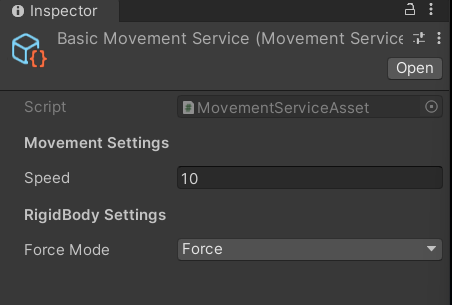
Fire up play mode again and use the WASD keys to move the cube (it should tumble around because we don't have any RigidBody constraints set).
More Settings
To stick to our rules and avoid prefab impact, I don't want to set RigidBody constraints on the component directly. Instead I want to set them via our new service asset. So let's add a method to be called from Awake.
using UnityEngine;

[CreateAssetMenu(fileName = "MovementServiceAsset", menuName = "ServiceAssets/MovementServiceAsset")]
public class MovementServiceAsset : ScriptableObject
{
    [Header("Movement Settings")]
    [Space(10)]

    [SerializeField] private float speed;

    [Header("RigidBody Settings")]
    [Space(10)]

    [SerializeField] private ForceMode forceMode;
    [SerializeField] private bool freezeRotation;

    [Header("Collider Settings")]
    [Space(10)]

    [Tooltip("Optional")]
    [SerializeField] private PhysicMaterial material;


    public void Initialize(Rigidbody body, Collider collider)
    {
        if (freezeRotation) body.constraints |= RigidbodyConstraints.FreezeRotation;
        if (material != null) collider.material = material;
    }

    public void Move(Rigidbody body, Vector3 direction)
    {
        Debug.Log($"Moving {body.name} in direction: {direction}");

        body.AddForce(direction * speed, forceMode);
    }
}
Another setting related to movement would be the PhysicMaterial which governs friction and bounciness of the Collider.
I'll avoid mass, because that might be something changed depending on the characteristics of a single model and not applied service-wide.
Add the call to Initialize in the CubeController Awake event.
using UnityEngine;

[RequireComponent(typeof(Rigidbody))]
public class CubeController : MonoBehaviour
{

    [SerializeField] private MovementServiceAsset movementService;

    private Rigidbody body;
    private Vector3 direction;

    private void Awake()
    {
        body = GetComponent<Rigidbody>();
        direction = Vector3.zero;
        movementService.Initialize(body, GetComponent<Collider>());
    }

    private void Update()
    {
        direction.x = Input.GetAxis("Horizontal");
        direction.z = Input.GetAxis("Vertical");
        direction.Normalize(); //handle diagonal scale
    }

    private void FixedUpdate()
    {
        if (direction == Vector3.zero) return;

        movementService.Move(body, direction);

    }
}
Create a new PhysicMaterial for the cube with default settings, add it to the BasicMovementService, and check to freeze rotation. Now that we've added friction, bump up speed to 20 (or play with this setting during play mode).
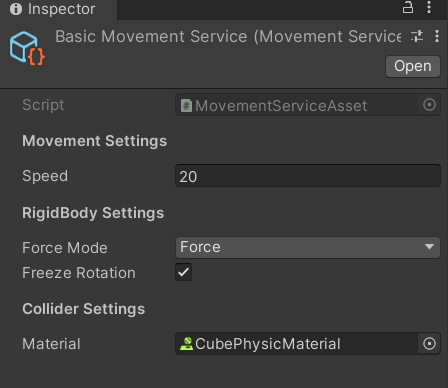
Hit play and move around, you'll see that the constraints have been set. You can now change these settings, which will be saved even in play mode and applied to all other objects using this service.
Another Service
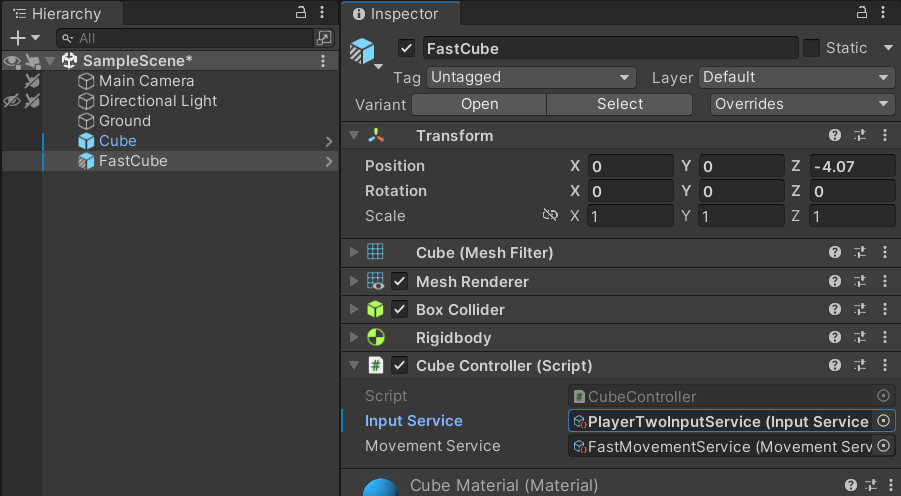
Ok great, let's prefab our Cube, dragging into the Project. Create a variant called FastCube. Duplicate BasicMovementService asset, call it FastMovementService and set the speed to 25. Assign this to the FastCube variant, and add an instance to the scene.
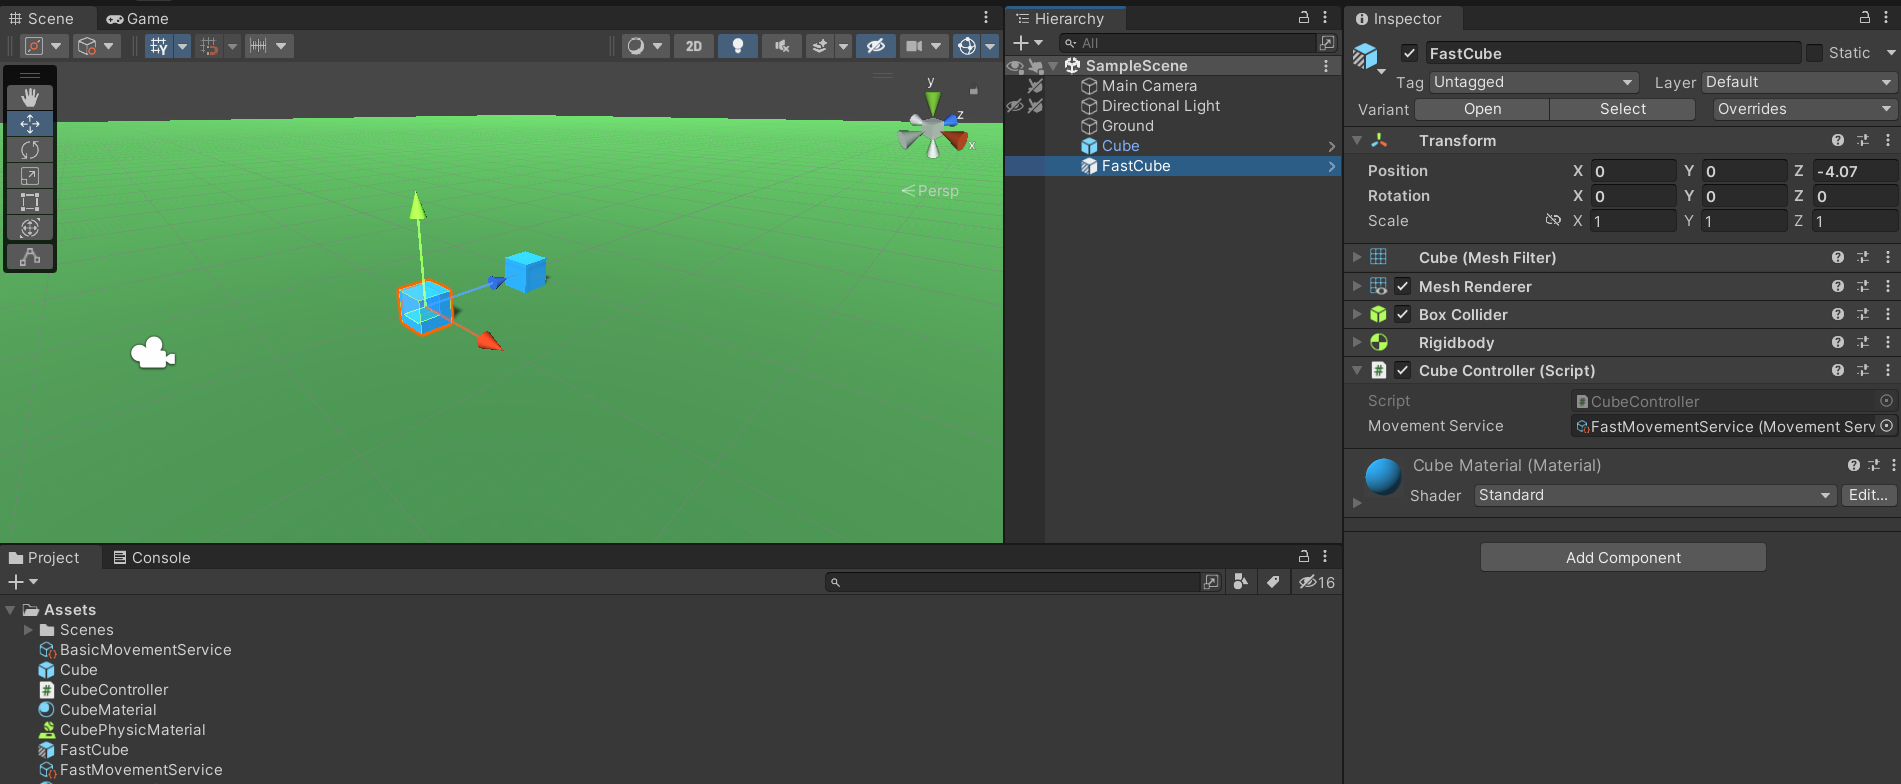
Start play mode and move around, you should see both cubes move but at different speeds. But what has that solved? We still have a problem. Let's make each cube a different player with individual input settings. Again typical approach would be fields on the prefab to govern input schemes. Instead we'll use a service asset.
Create a new script called InputServiceAsset which will contain our key mappings.
using UnityEngine;

[CreateAssetMenu(fileName = "InputServiceAsset", menuName = "ServiceAssets/InputServiceAsset")]
public class InputServiceAsset : ScriptableObject
{
    [Header("Key Mappings")]
    [Space(10)]

    [SerializeField] private KeyCode up;
    [SerializeField] private KeyCode left;
    [SerializeField] private KeyCode down;
    [SerializeField] private KeyCode right;

    public Vector3 Poll()
    {
        var direction = Vector3.zero;

        if (Input.GetKey(up)) direction += Vector3.forward;
        if (Input.GetKey(left)) direction += Vector3.left;
        if (Input.GetKey(down)) direction += Vector3.back;
        if (Input.GetKey(right)) direction += Vector3.right;

        return direction.normalized;
    }
}
Add a field to the CubeController to hold an InputServiceAsset instance and change Update to use the Poll method to get direction each frame.
using UnityEngine;

[RequireComponent(typeof(Rigidbody))]
public class CubeController : MonoBehaviour
{
    [SerializeField] private InputServiceAsset inputService;
    [SerializeField] private MovementServiceAsset movementService;

    private Rigidbody body;
    private Vector3 direction;

    private void Awake()
    {
        body = GetComponent<Rigidbody>();
        direction = Vector3.zero;
        movementService.Initialize(body, GetComponent<Collider>());
    }

    private void Update()
    {
        direction = inputService.Poll();
    }

    private void FixedUpdate()
    {
        if (direction == Vector3.zero) return;

        movementService.Move(body, direction);
    }
}
Now we are better sticking to rules. The MonoBehaviour is coordinating 2 services, storing state and orchestrating different components.
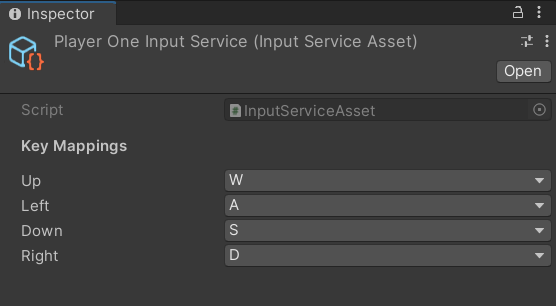
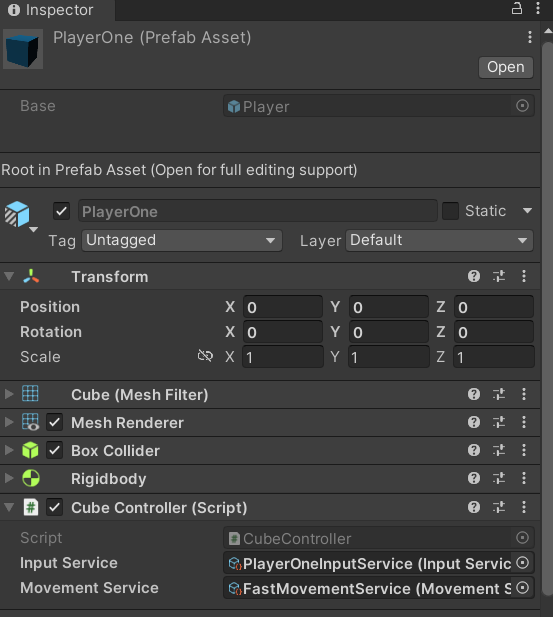
Create an instance of InputServiceAsset called "PlayerOneInputService".

Assign keys for WASD movement.
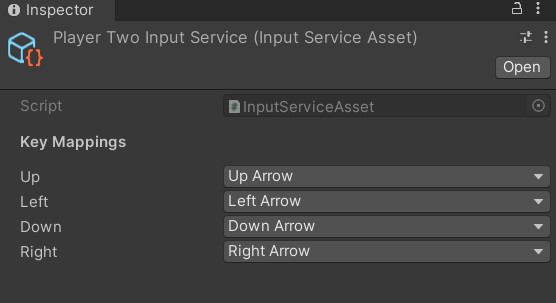
Duplicate the asset, name it "PlayerTwoInputService" and change the keys to handle arrow movement.
Assign the "PlayerOneInputService" to one of the cubes in the scene, assign "PlayerTwoInputService" to the other.
Enter play mode and test out each cube with each set of keys.
Summary
Let's organize and look at our project now.
We have 3 scripts, two of which are ScriptableObjects. The CubeController, which is the single MonoBehaviour for our "Player" game objects. It gets injected with services that contain game logic. The CubeController doesn't need to supply any settings for these services, they are self-contained, it simply passes state around to and from services. You can test different player settings simply by switching out the assets on the game object or by changing the values in the referenced assets directly.
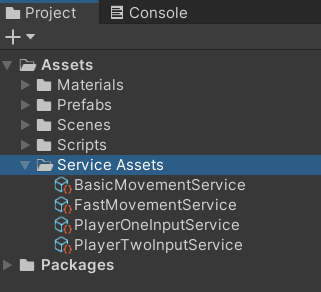
We have 4 service assets, a couple of variations of movement, and 2 different player input mappings. These can be tested from any script independently and don't require having their own state or references. They can be duplicated and customized easily and have clear responsibilities.
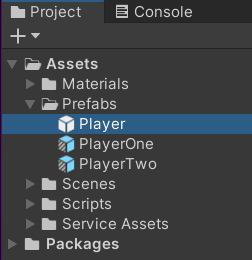
We have one prefab with 2 variants. The base prefab references a movement service asset, so that all players share the same movement characteristics. You could extend this to have a reference to both basic movement and fast movement, then switch to fast at runtime when a player has a "boost", for example.
Then each player variant references a custom input service asset to define controls.
Now the elements of the project play to their strengths and avoid some of their pain points as complexity scales. You could even distribute new configurations of services via Addressables after install.
Project on Github
- https://github.com/PlayableDesign/ServiceAssets
Please comment, contribute, and let me know what you think about service assets!


