

Unity Single Scene Architecture - Loading
Series Post 3

Indie Game Studio Owner | Game Designer | Game Developer | Game Artist | Cloud Architect | Technology Leader | Product Manager | Entrepreneur
This is a post in a series about building a game in Unity using a single scene.
Unity Single Scene Architecture Series
In this post, we'll build a loading screen and talk all about loading assets in Unity. The loading screen will display as the game starts. We'll also use it when loading levels and anywhere else that the player may need to wait on a long-running loading activity.
Framing Out the Loading Screen
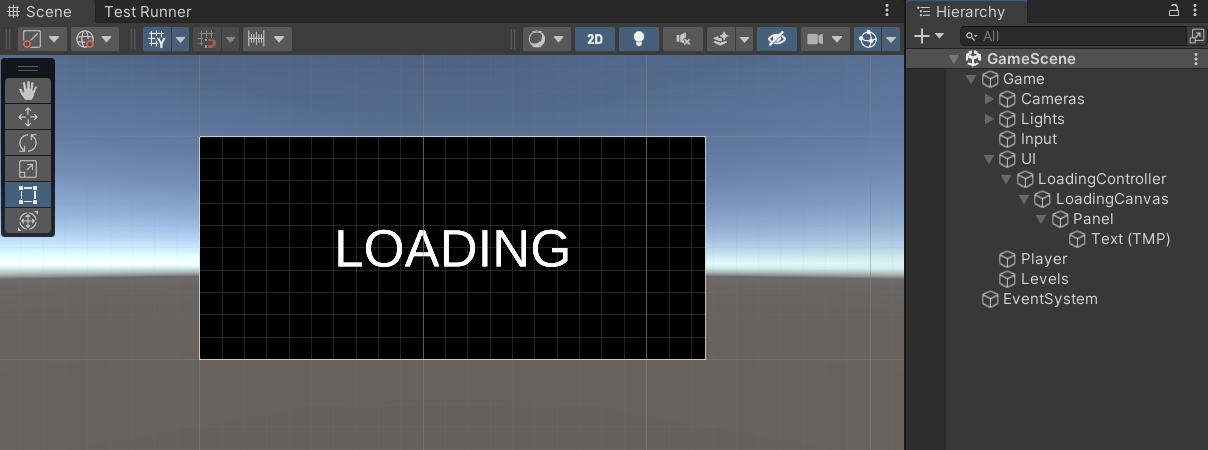
Let's start by framing out the game objects for the loading screen.
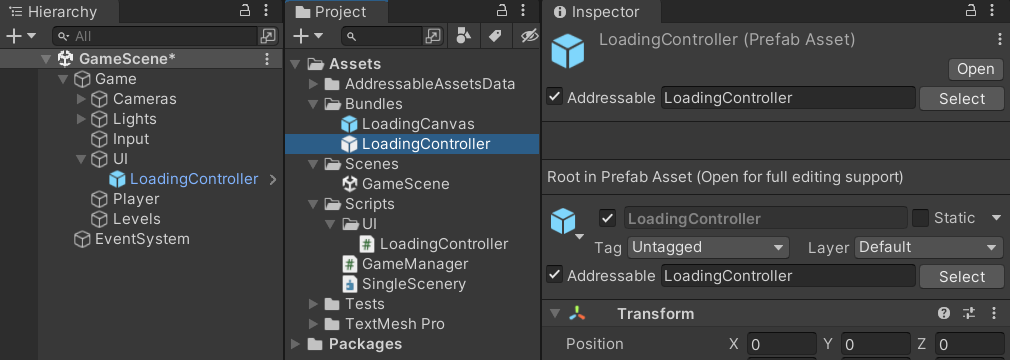
- Add a child empty game object underneath "UI" named "LoadingController"
- Add a child to "LoadingController" from the context menu
UI > Canvasnamed "LoadingCanvas" - Change the
Canvas Scalercomponent toScale With Screen SizewithReferenceResolutionset to 1920 x 1080 - Add a child to "LoadingCanvas" from the context menu
UI > Panel - Set the Image component
Colorto black with no transparency - Add a child to "Panel" from the context menu
UI > Text - Text Mesh Pro(Import TMP Essentials if prompted) - Set the
Rect Transformto middle stretch - Set the text to "Loading", center the horizontal and vertical alignments, set font size to 200
You should have a loading screen that looks like this:
Loading Screen - Prefab
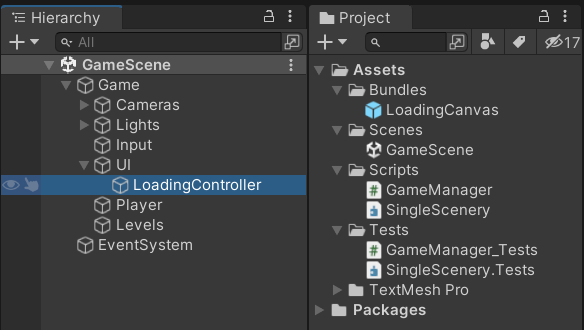
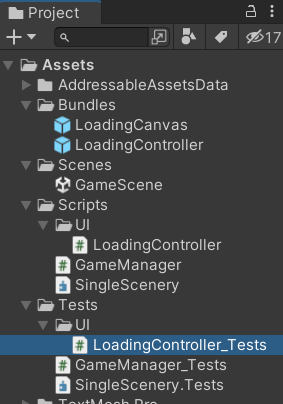
Create a prefab for the "LoadingCanvas". In the Project window create a new folder "Bundles" (this will be relevant in a later part of the series dealing with building asset bundles). Select the "LoadingCanvas" game object in the scene and drag it into the newly created Bundles folder to make it a prefab. Now you can delete "LoadingCanvas" from the scene.
Loading Screen - Scripting
In the Project under "Scripts" create a new folder called "UI", then add a new script named "LoadingController".
We will add methods for loading and unloading assets at runtime, which will be available later when optimizing memory usage vs load times. We also need methods to show and hide the loading screen once loaded and instantiated.
Add the following code to LoadingController:
using System.Collections;
using UnityEngine;

namespace SingleScenery
{
    public class LoadingController : MonoBehaviour
    {
        [SerializeField] private GameObject loadingCanvasPrefab;

        public bool Ready => _ready;
        private bool _ready;

        private GameObject _loadingCanvas;

        public IEnumerator Load()
        {
            _loadingCanvas = Instantiate(loadingCanvasPrefab, transform);
            yield return null;
            _ready = true;
        }

        public void Unload()
        {
            _ready = false;
            Destroy(_loadingCanvas);
        }

        public void Show()
        {
            if (_ready)
            {
                _loadingCanvas.SetActive(true);
            }
        }

        public void Hide()
        {
            if (_ready)
            {
                _loadingCanvas.SetActive(false);
            }
        }

    }
}
Nothing exciting here, you've probably seen this prefab pattern in many other examples. We'll change this shortly, but it is relevant to understanding why.
A Brief Explanation of Assets and Instantiation
I think of an "asset" in Unity as anything that is not source code (a script). A sprite, an audio file, a mesh, a material, instances of scriptable objects, and prefabs are all common examples. Assets get packaged at build time with the player via different methods depending on how they are organized.
Assets are often directly referenced by game objects in a scene, which by default get loaded into memory with the scene at runtime (even if they are not instantiated).
Now our current LoadingController references a prefab, which will be loaded into memory even before being instantiated and remain there until the scene is unloaded. We don't want that because this pattern will break the single scene architecture.
If every prefab used in the game is referenced in the scene (UI, levels, models, audio, etc) they will all be loaded into memory and likely make the game unplayable on most platforms. This is why we typically break up games into multiple scenes...
Introducing Addressables
Instead of hard referencing the loading canvas prefab, let's use Addressables to instead load and unload the prefab on demand using a "weak reference". This means when the scene loads, the prefab being referenced will not be loaded into memory.
Let's learn a few core things about Addressables:
- Each asset marked as an Addressable has a string address that identifies it and can be used to load it without knowing where it exists in the project
- The
AddressablesAPI is mostly asynchronous, which can have rippling effects when added to an existing code base. I'll be usingCoroutinesto encapsulate these async API calls Addressablestracks reference counts to loaded assets, you must also use Addressables to unload assets to avoid resource leaks
Refactoring for Weak References
Let's change the loading controller code to use the Addressables API.
using System.Collections;
using UnityEngine;
using UnityEngine.AddressableAssets;
using UnityEngine.ResourceManagement.AsyncOperations;

namespace SingleScenery
{
    public class LoadingController : MonoBehaviour
    {
        [SerializeField] private AssetReference loadingCanvasPrefab;

        public bool Ready => _ready;
        private bool _ready;

        private GameObject _loadingCanvas;

        public void Load()
        {
            StartCoroutine(LoadAsync());
        }

        public IEnumerator LoadAsync()
        {
            var handle = Addressables.InstantiateAsync(loadingCanvasPrefab, transform);

            yield return handle;  // wait for async call completion

            if (handle.Status == AsyncOperationStatus.Succeeded)
            {
                _loadingCanvas = handle.Result;
                _loadingCanvas.SetActive(false);
                _ready = true;
            }
        }

        public void Unload()
        {
            _ready = false;
            Addressables.ReleaseInstance(_loadingCanvas); // will decrement refence count
        }

        public void Show()
        {
            if (_ready)
            {
                _loadingCanvas.SetActive(true);
            }
        }

        public void Hide()
        {
            if (_ready)
            {
                _loadingCanvas.SetActive(false);
            }
        }

    }
}
You'll see some of the following changes:
- Changed the prefab reference to be an
AssetReference, which requires an asset marked as Addressable - Changed the loading and unloading code to use the
AddressablesAPI
If you read the docs, you'll quickly run into several different ways to accomplish the same thing. We're starting by using one of the easiest APIs in the package, which combines loading the asset and instantiating into one async call. When this is completed, which is trackable with the "handle", the prefab is not only loaded into memory but also instantiated into the game scene. There are other API calls we could use to do this in two steps (load and then instantiate), but we don't require that for now.
Configuration
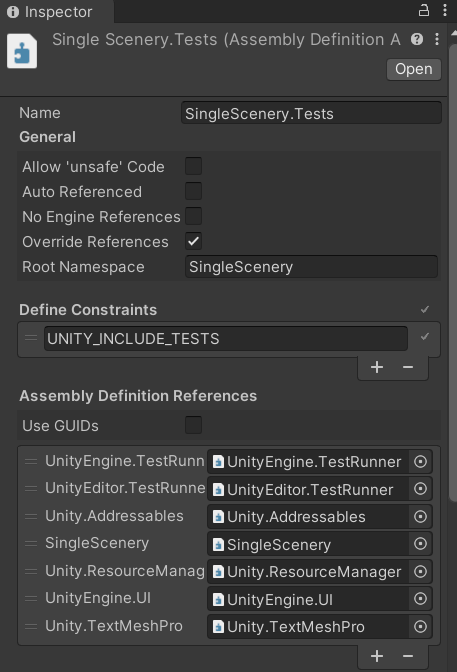
Switch back to the editor to setup 'Addressables'. You should have an error because we're missing an Assembly Definition Reference in the SingleScenery assembly definition file. Select it and add "Unity.ResourceManager" to the references, then Apply.
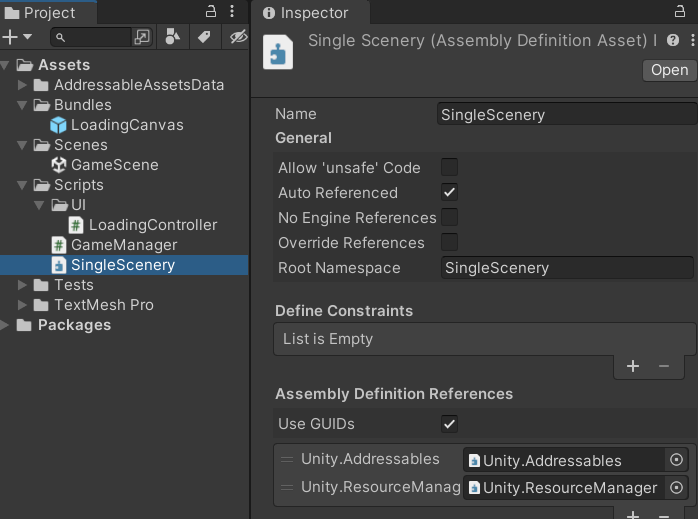
Do the same for the SingleScenery.Tests assembly definition and Apply.
Welcome to the pains of assembly definitions... if you ever forget and find yourself unable to add a using statement for no reason, it's probably because of this.
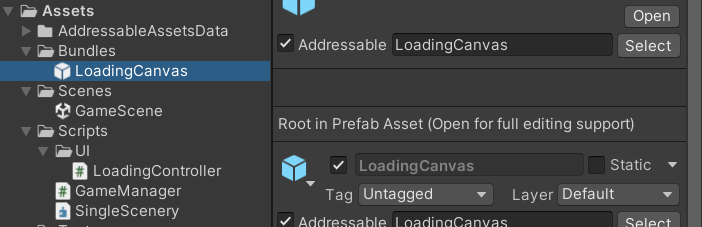
Select the "LoadingCanvas" prefab in the Project and then check the Addressable field in the Inspector. The address will default to the project path but can be anything you put here. Let's just keep it simple and set the address to "LoadingCanvas".
Also note that the package has initialized its configuration in the "AddressableAssetsData" folder. We'll come back to that later.
Now select the "LoadingController" in the Scene and add the "LoadingCanvas" addressable asset to the field for "LoadingCanvasPrefab". Let's also prefab the controller and make it an Addressable. Drag it into the "Bundles" folder, check Addressable and name it "LoadingController".
Testing
How do we know our LoadingController works? It's not wired up in the scene yet and we don't want to always have to manually check if this prefab is working or not. Let's add a PlayMode test.
Create a "UI" folder underneath "Tests" and add a new test script called "LoadingController_Tests".
Another benefit of using Addressables is that we can load and unload assets easily from our tests, which avoids a lot of boilerplate code. To setup a temporary scene the test script will need to:
- Add a camera to the scene, so we can visually inspect the test run if needed
- Load and instantiate the "LoadingController" prefab asset using
Addressables - Clean up after the tests have run
Our actual tests should cover the public API that will be used at runtime (Load, Show, Hide, and Unload).
Before adding our test code, we'll be referencing new packages UnityEngine.UI and Unity.TextMeshPro. Add them to the "SingleScenery.Test" assembly definition file. Be sure to click Apply.
Open the new test script add the following test code:
using System.Collections;
using NUnit.Framework;
using TMPro;
using UnityEngine;
using UnityEngine.AddressableAssets;
using UnityEngine.ResourceManagement.AsyncOperations;
using UnityEngine.TestTools;

namespace SingleScenery
{
    public class LoadingController_Tests
    {
        // Test Settings

        const string ADDRESS = "LoadingController";
        const string LOADING = "LOADING";
        const float DELAY = 3f;

        WaitForSeconds delay;
        LoadingController controller;
        bool _setup;

        [OneTimeSetUp]
        public void OneTimeSetUp()
        {
            new GameObject("Camera").AddComponent<Camera>();
            delay = new WaitForSeconds(DELAY);
        }

        [UnitySetUp]
        public IEnumerator Setup()
        {
            if (_setup) yield break;

            var handle = Addressables.InstantiateAsync(ADDRESS);
            yield return handle;  // wait for async call completion

            Assert.That(handle.Status == AsyncOperationStatus.Succeeded);
            Assert.IsNotNull(handle.Result);

            controller = handle.Result.GetComponent<LoadingController>();

            Assert.IsFalse(controller.Ready);

            _setup = true;

            Debug.Log("Setup: controller is instantiated in test scene");
        }

        [OneTimeTearDown]
        public void TearDown()
        {
            if (controller != null)
            {
                Addressables.ReleaseInstance(controller.gameObject);
            }

            Debug.Log("Teardown: controller reference is released");
        }

        [UnityTest, Order(1), Timeout(5000)]
        public IEnumerator Step_1_Load()
        {
            controller.Load();

            yield return new WaitUntil(() => controller.Ready);

            var canvas = controller.gameObject.GetComponentInChildren<Canvas>(true);
            var text = controller.gameObject.GetComponentInChildren<TMP_Text>(true);

            Assert.That(controller.transform.childCount > 0);
            Assert.IsNotNull(canvas);
            Assert.IsNotNull(text);
            Assert.IsFalse(canvas.gameObject.activeInHierarchy);
            Assert.That(text.text == LOADING);

            Debug.Log("Test: controller load passed");
            yield return delay;
        }

        [UnityTest, Order(2)]
        public IEnumerator Step_2_Show()
        {
            controller.Show();

            var canvas = controller.gameObject.GetComponentInChildren<Canvas>(true);
            Assert.IsTrue(canvas.gameObject.activeInHierarchy);

            Debug.Log("Test: controller show passed");
            yield return delay;
        }

        [UnityTest, Order(3)]
        public IEnumerator Step_3_Hide()
        {
            controller.Hide();

            var canvas = controller.gameObject.GetComponentInChildren<Canvas>(true);
            Assert.IsFalse(canvas.gameObject.activeInHierarchy);

            Debug.Log("Test: controller hide passed");
            yield return delay;
        }

        [UnityTest, Order(4)]
        public IEnumerator Step_4_Unload()
        {
            controller.Unload();
            yield return delay;
            Assert.That(controller.transform.childCount == 0);
            Debug.Log("Test: controller unload passed");
        }

    }

}
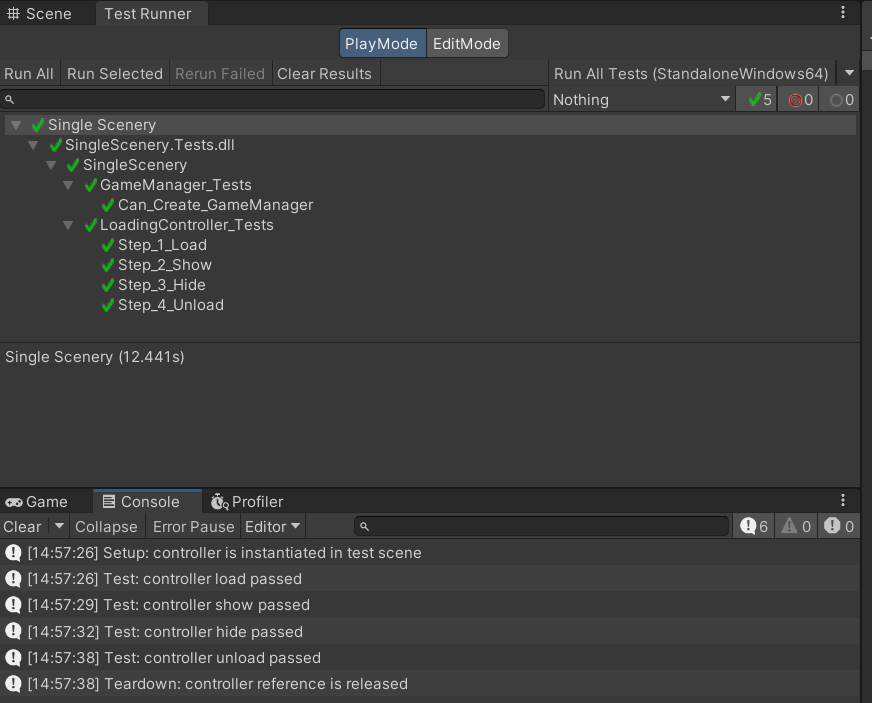
Tricky stuff... the Unity Test Framework is basically NUnit with modifications to add in support for coroutines, which we need with the async portions of our code. Now go back to the editor, use the TestRunner to execute all of the tests with Run All.
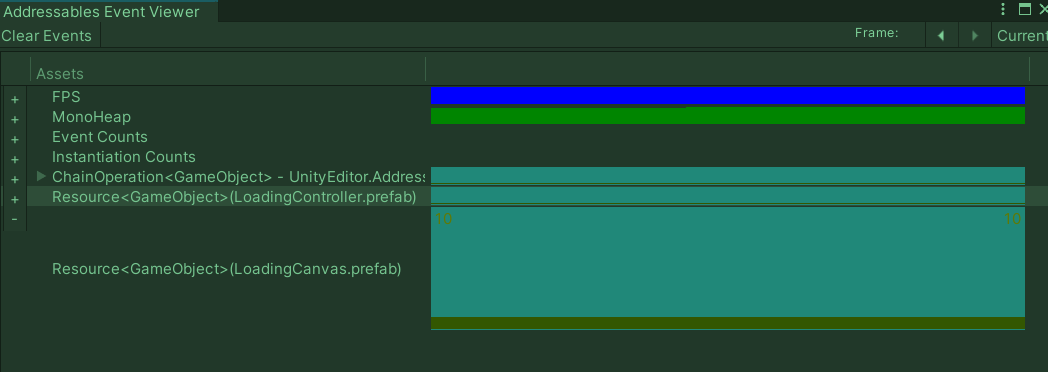
You can follow along in the game view and watch the loading screen display, but how do we know that these assets are loading and unloading in memory?
Go to Window > Asset Management > Addressables > Settings which will select the global settings for Addressables in the project. In the Inspector, check Send Profiler Events. Now open the Addressables Event Viewer with Window > Asset Management > Addressables > Event Viewer. Keep this open and then run all of the tests again.
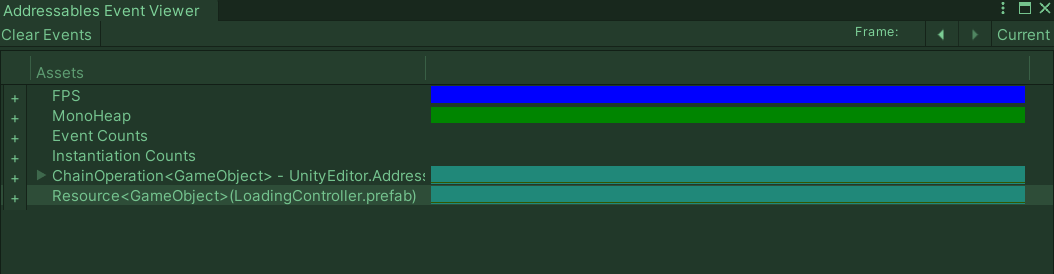
After "Load" is called, you will see the "LoadingCanvas" prefab is loaded into memory.
After "Unload" is called, you will see it is also removed from memory.
Summary
Wow! That's a lot for just a loading screen, right? While true, I hope this demonstrates the power behind Addressables and this architecture.
- You can load everything and keep it in memory for fast UX, but later optimize by inserting load/unload calls that are already part of the component's API
- You could add several versions of a loading screen with no memory impact
- You can later revise the loading screen and update it seamlessly after install
- A team member can modify the LoadingCanvas without ever having to touch the scene
- If someone breaks the LoadingCanvas prefab or the LoadingController, you'll know it with the tests
- Create different loading canvases for different resolutions / platforms and only load the appropriate ones at runtime (or download, which we'll cover later)
We'll be using this same pattern in the series and apply it to more UI, the Player, and Levels.
Source Code for this Post:
Next
Follow along to the next post in the series.
Unity Single Scene Architecture Series
If you're finding value in these posts, please leave a comment below to let me know (it's a lot of work) and share on your social media for others. Thanks for reading!


