

Unity Single Scene Architecture - Game Manager
Series Post 2

Indie Game Studio Owner | Game Designer | Game Developer | Game Artist | Cloud Architect | Technology Leader | Product Manager | Entrepreneur
This is a post in a series about building a game in Unity using a single scene.
Unity Single Scene Architecture Series
In this post, we will add a GameManager, Assembly Definitions, and play mode testing to the game.
Game Manager
Let's create a game manager script that will be responsible for orchestrating its child game systems. The script will be empty for now, but we'll be adding to it throughout the series.
In the Project window, create a new folder for Scripts underneath the "Assets" folder. Create a new C# script called "GameManager".
Open the script in your editor and replace with this placeholder code.
using UnityEngine;

namespace SingleScenery
{
    public class GameManager : MonoBehaviour
    {

    }
}
Then drag the script onto the "GameManager" object in the scene.
Assembly Definition
If you're not familiar with Assembly Definition files, then review the topic.
We're going to add one that will contain all of the source code for Single Scenery. Using an assembly definition will help with domain reloads as code scales as well as simplify testing with the Unity Test Framework.
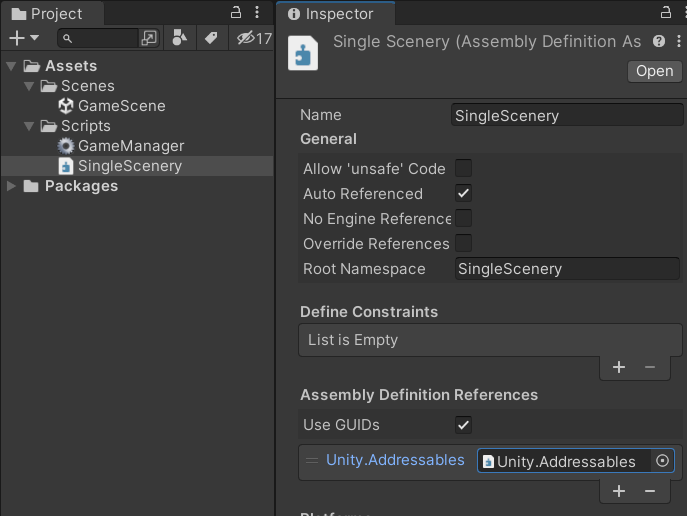
Right-click the "Scripts" folder and add an Assembly Definition named "SingleScenery".

Once created modify its settings in the Inspector window.
- Set
Root Namespaceto "SingleScenery" - Add a reference under
Assembly Definition ReferencestoUnity.Addressables
Click Apply to save the settings.
Test Assembly
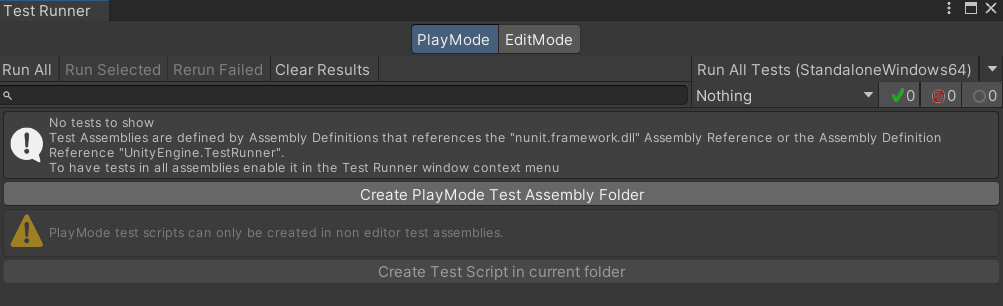
Now we can create a test assembly using the Unity Test Framework for play mode tests that we will later use to ensure our prefabs don't break.
Go to Window > General > TestRunner and then select PlayMode at the top. Click Create Playmode Test Assembly Folder. You should now have a folder called "Tests" with an assembly definition file of the same name.
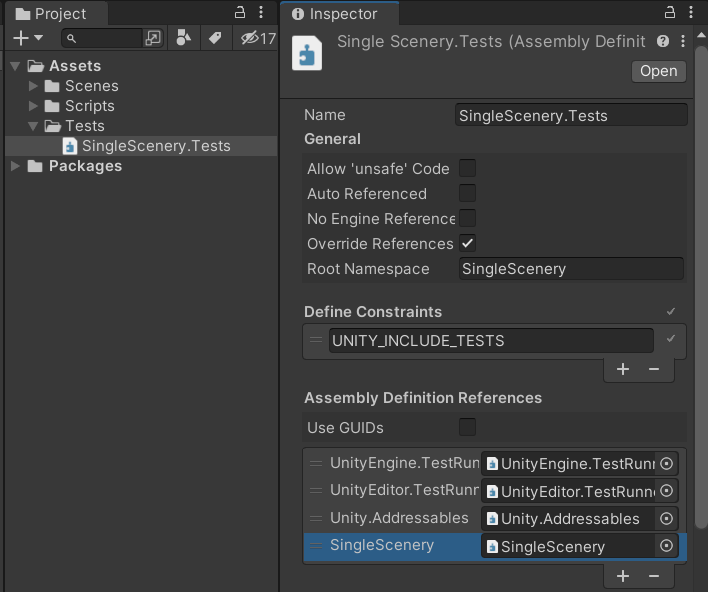
Rename the file to "SingleScenery.Tests", select it and make the following changes in the Inspector window.
- Change
Nameto "SingleScenery" - Set
Root Namespaceto "SingleScenery" - Add a reference under
ssembly Definition ReferencestoUnity.Addressables - Add a reference under
Assembly Definition ReferencestoSingleScenery
Test Script
Now we can add our first play mode test. If you're not familiar with tests, I'll cover more as the series progresses. A play mode test is executed by the TestRunner which creates a temporary scene and then executes tests in the scripts that are compiled into the test assembly.
Right-click the "Tests" folder and go to Create > Testing > C# Test Script and create a new script called "GameManager_Tests". Open in your editor and add the following placeholder code.
using NUnit.Framework;
using UnityEngine;

namespace SingleScenery
{
    public class GameManager_Tests
    {

        [Test]
        public void Can_Create_GameManager()
        {
            var go = new GameObject("Game");
            var gm = go.AddComponent<GameManager>();

            Assert.IsInstanceOf<GameManager>(gm);

        }

    }
}
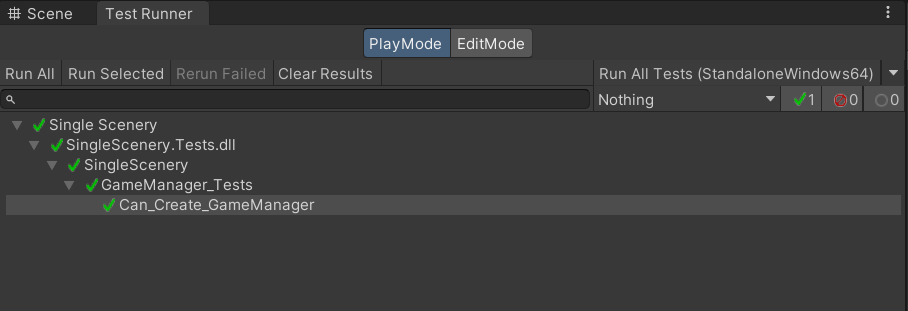
When this test is run it will simply verify that all our references are correctly setup by creating a new game object in the temp scene and adding a GameManager component to it.
Go to the TestRunner window and RunAll to run the test.
Summary
We now have a GameManager, an assembly for our game's source code, a test assembly for our tests, and correct references setup to start building more logic.
Next
Follow along to the next post in the series.


